Category Archives: Uncategorized

Dual booting option with GRUB between Desktop and Terminal Modes

This article presents how to setup a dual booting option using Grub to select between Ubuntu Desktop or Terminal Only modes.

Introduction

Desktop environments make development easy but the execution of an application often does not need the desktop GUI environment. Actually, the desktop environments deteriorate the performance of an application especially if the application needs an RT performance. For the comparison, see another article of mine.

Thus, when we develop an application, the desktop environment is more useful than desktop environment, and otherwise, vise versa. There are multiple ways to transit between these two modes. In my opinion, dual booting is a nice option to achieve this goal. Particularly GRUB allows us for setting up the dual booting option easily.

Setup

Installation of Grub cusotmizer

I am using Grub Customizer to ease the process. For the installation follow the command below:

sudo add-apt-repository ppa:danielrichter2007/grub-customizer 
sudo apt update
sudo apt install grub-customizer

Setup of Grub cusotmizer

Open Grub Customizer by typing “Grub customizer” after press Menu button. Then, you will see menu below:

Then, choose the first option which is for Desktop. Then, click edit (Pencil Icon). You will see some pop-up like below:

Copy the entire boot sequence and paste it at a text editor. We will use this one later. Press “Cancel”, then go back to the main menu and click “New” button “+” Icon. Write the name of new booting configuration and, choose type “Other”. Then paste the text you got from previous Boot option. Here what you need to do is add 3 for the line “linux”. For details, see below:

linux    /boot/vmlinuz-4.4.208-rt191esmacat-master-s root=UUID=68f423de-1e99-43a2-a050-58e26b2ffb29 ro 3 quiet splash $vt_handoff

Once you finish, then press “Save” and “Exit”. Then boot again.

Result

Once you boot up, then you will see the menu allowing you to choose different options including “Command-line”. Once you choose the “Command-line” option, you can use Linux without loading desktop environments.

I hope this article helps your project. Good luck!

RT Periodic Thread Code and Scheduler Policy and Priority

in this post, I am going to share an example code creating two threads running with a periodic cycle in an RT Preempt Linux.

You can download the code in this link.

https://github.com/queristq/rt_periodic_thread/archive/master.zip or you can git clone by git clone https://github.com/queristq/rt_periodic_thread.git

To build the code,

  • mkdir build
  • cd build
  • cmake ..
  • make

RT Performance between SCHED_RT and SCHED_IDLE

In the code, I have created two threads, and tested the RT performance for two different thread schedule policy between SCHED_RT and SCHED_IDLE. The figure below shows the result. The blue line shows the log10-scaled histogram of the loop time, and the orange line shows the log10-scaled histogram of the loop time. As shown in the plot, SCHED_RT made low jitters in the periodic loops. The test environment was not strictly controlled (I did internet browsing… while the loop was running).

1

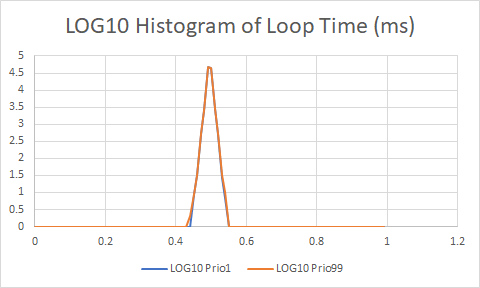
RT Performance over Different Thread Priorities

I have conducted similar tests with different thread priority. I have selected the same thread policy SCHED_FIFO, and the priority of two threads were chosen to 1 and 99 respectively. The jitters of the each loop is shown in the figure below. As shown in the figure, interestingly the difference was very minor. Once you see the details, you can see the result of Priority 1 is slightly better.

2

If you want a full result, you can see the test result in the attached excel sheet.

Example code

#include <stdio.h>
#include <stdlib.h>
#include <time.h>
#include <pthread.h>

#define TIMESPEC_ADD(A,B) /* A += B */ \
    do {                                   \
    (A).tv_sec += (B).tv_sec;          \
    (A).tv_nsec += (B).tv_nsec;        \
    if ( (A).tv_nsec >= 1000000000 ) { \
    (A).tv_sec++;                  \
    (A).tv_nsec -= 1000000000;     \
    }                                  \
    } while (0)

#define TIMESPEC_SUB(A,B) /* A -= B */ \
    do {                                   \
    (A).tv_sec -= (B).tv_sec;          \
    (A).tv_nsec -= (B).tv_nsec;        \
    if ( (A).tv_nsec < 0 ) {           \
    (A).tv_sec--;                  \
    (A).tv_nsec += 1000000000;     \
    }                                  \
    } while (0)


void *thread_func ( void *param )
{
    FILE *fp;
    char filename_fp[50];

    long thread_id = (long) param;

    sprintf (filename_fp, "%ld%s", thread_id, ".txt");
    fp = fopen(filename_fp, "w");//opening file

    struct timespec t_next, period, t_now, t_prev, t_diff;

    /* period = 1 ms * thread_id */
    period.tv_sec = 0;
    period.tv_nsec = ( 1 ) * 500000; // a x ms

    clock_gettime ( CLOCK_MONOTONIC, &t_now );
    t_next = t_now;
    t_prev = t_now;

    int t_jitter[100];
    for (int i=0;i<100;i++) t_jitter[i] = 0;
    int t_j = 0;

    for ( int i = 0; i < 100000; i++ )
    {
        clock_gettime ( CLOCK_MONOTONIC, &t_now );
        t_diff = t_now;
        TIMESPEC_SUB ( t_diff, t_prev );
        t_prev = t_now;
        t_j = t_diff.tv_nsec / 10000;
        if (t_j<0) t_jitter[0]++;
        else if (t_j>99) t_jitter[99]++;
        else t_jitter[t_j]++;
        if(i%10000==1) printf("%d\n",i);
        TIMESPEC_ADD ( t_next, period );
        clock_nanosleep ( CLOCK_MONOTONIC, TIMER_ABSTIME, &t_next, NULL );
    }

    for (int i=0;i<100;i++) {
        printf("%d ",t_jitter[i]);
        fprintf(fp, "%d\n",t_jitter[i]);
    }
    fclose(fp);
    return NULL;
}

int main ()
{
    int policy;
    struct sched_param prio;
    pthread_attr_t attr;

    pthread_t tid1;
    pthread_t tid2;

    policy = SCHED_OTHER;
    if (pthread_setschedparam( pthread_self(),policy, &prio )){
        perror ("Error: pthread_setschedparam (root permission?)");
        exit(1);
    }

    pthread_attr_init( &attr);
    pthread_attr_setinheritsched( &attr, PTHREAD_EXPLICIT_SCHED);
    policy = SCHED_FIFO;
    pthread_attr_setschedpolicy( &attr, policy);
    prio.sched_priority = 99; // priority range should be btw -20 to +19
    pthread_attr_setschedparam(&attr,&prio);

    if ( pthread_create(&tid1, &attr, thread_func, (void *)(1)) ){
        perror ( "Error: pthread1_create" );
        return 1;
    }

    pthread_attr_init( &attr);
    pthread_attr_setinheritsched( &attr, PTHREAD_EXPLICIT_SCHED);
    policy = SCHED_FIFO;
    pthread_attr_setschedpolicy( &attr, policy);
    prio.sched_priority = 1; // priority range should be btw -20 to +19
    pthread_attr_setschedparam(&attr,&prio);

    if ( pthread_create(&tid2, &attr, thread_func, (void *)(2)) ){
        perror ( "Error: pthread2_create" );
        return 1;
    }

    /* wait for threads to finish */
    pthread_join ( tid1, NULL );
    pthread_join ( tid2, NULL );

    return 0;
}

If you are interested in how to make an RT Linux, please see another post of mine.

I found a very good material to study deeper on RT thread.

  • https://csperkins.org/teaching/2004-2005/rtes5/lecture10.pdf
  • http://retis.sssup.it/~lipari/courses/str09/10.rtprogramming-handout.pdf

If you have any questions on this code or this post, please leave a reply. Then, good luck!

[1] Nanosleep, http://man7.org/linux/man-pages/man2/nanosleep.2.html

[2] Timespec basic operation, http://www.zemris.fer.hr/~leonardo/srsv/skripta/src/periodic-tasks-2.c

Easycat and SOEM

In this post, I am sharing a code that I developed for integrating Easycat slaves and Simple Open Ethercat Master (SOEM).

This is still an ongoing project, and thus there are many insufficient parts.

The info about Easycat:

www.bausano.net/

The info about SOEM

https://openethercatsociety.github.io/

The code is attached here

http://youngmok.com/public_data/SOEM.zip

http://youngmok.com/public_data/TestEasyCat.zip


The below is the setup pic.

IMG_0099

The below is an execution example.

reneu@reneu-Precision-T1600:~/soem/SOEM/build/test/linux/my_test$ sudo ./my_test eth0
SOEM (Simple Open EtherCAT Master)
Simple test
Starting simple test
ec_init succeeded.
5 slaves found and configured.
Slaves mapped, state to SAFE_OP.

Slave:1
Name:EK1100
Output size: 0bits
Input size: 0bits
State: 18
Delay: 0[ns]
Has DC: 1
Configured address: 1001
Outputs address: 0
Inputs address: 0
FMMUfunc 0:0 1:0 2:0 3:0

Slave:2
Name:EL1014
Output size: 0bits
Input size: 4bits
State: 18
Delay: 0[ns]
Has DC: 1
Configured address: 1002
Outputs address: 0
Inputs address: 8062180
FMMU0 Ls:40 Ll:   1 Lsb:0 Leb:3 Ps:1000 Psb:0 Ty:1 Act:1
FMMUfunc 0:2 1:0 2:0 3:0

Slave:3
Name:EL3102
Output size: 0bits
Input size: 48bits
State: 2
Delay: 0[ns]
Has DC: 1
Configured address: 1003
Outputs address: 0
Inputs address: 8062181
FMMU0 Ls:41 Ll:   6 Lsb:0 Leb:7 Ps:1180 Psb:0 Ty:1 Act:1
FMMUfunc 0:2 1:3 2:0 3:0

Slave:4
Name:EasyCAT 32+32
Output size: 256bits
Input size: 256bits
State: 18
Delay: 0[ns]
Has DC: 1
Configured address: 1004
Outputs address: 8062140
Inputs address: 8062187
FMMU0 Ls:0 Ll:  32 Lsb:0 Leb:7 Ps:1000 Psb:0 Ty:2 Act:1
FMMU1 Ls:47 Ll:  32 Lsb:0 Leb:7 Ps:1200 Psb:0 Ty:1 Act:1
FMMUfunc 0:1 1:2 2:0 3:0

Slave:5
Name:EasyCAT 32+32
Output size: 256bits
Input size: 256bits
State: 18
Delay: 0[ns]
Has DC: 1
Configured address: 1005
Outputs address: 8062160
Inputs address: 80621a7
FMMU0 Ls:20 Ll:  32 Lsb:0 Leb:7 Ps:1000 Psb:0 Ty:2 Act:1
FMMU1 Ls:67 Ll:  32 Lsb:0 Leb:7 Ps:1200 Psb:0 Ty:1 Act:1
FMMUfunc 0:1 1:2 2:0 3:0
Request operational state for all slaves
Operational state reached for all slaves.

0:
O: ff 00 00 00 00 00 00 00 00 00 00 00 00 00 00 00 00 00 00 00 00 00 00 00 00 00 00 00 00 00 00 00
I: d4 d2 db 79 25 86 ab cd ef 00 00 00 00 00 00 00 00 00 00 00 00 00 00 00 00 00 00 00 00 00 6c 94
1:
O: ff 00 00 00 00 00 00 00 00 00 00 00 00 00 00 00 00 00 00 00 00 00 00 00 00 00 00 00 00 00 00 00
I: d4 d2 db 79 25 86 ab cd ef 00 00 00 00 00 00 00 00 00 00 00 00 00 00 00 00 00 00 00 00 00 6c 94
2:
O: ff 00 00 00 00 00 00 00 00 00 00 00 00 00 00 00 00 00 00 00 00 00 00 00 00 00 00 00 00 00 00 00
I: d3 cf db 79 25 86 ab cd ef 00 00 00 00 00 00 00 00 00 00 00 00 00 00 00 00 00 00 00 00 00 6c 94
3:
O: ff 00 00 00 00 00 00 00 00 00 00 00 00 00 00 00 00 00 00 00 00 00 00 00 00 00 00 00 00 00 00 00
I: d3 d1 db 79 25 86 ab cd ef 00 00 00 00 00 00 00 00 00 00 00 00 00 00 00 00 00 00 00 00 00 6c 94
4:
O: ff 00 00 00 00 00 00 00 00 00 00 00 00 00 00 00 00 00 00 00 00 00 00 00 00 00 00 00 00 00 00 00
I: d3 d1 db 79 25 86 ab cd ef 00 00 00 00 00 00 00 00 00 00 00 00 00 00 00 00 00 00 00 00 00 6c 94
5:
O: ff 00 00 00 00 00 00 00 00 00 00 00 00 00 00 00 00 00 00 00 00 00 00 00 00 00 00 00 00 00 00 00
I: d3 d1 db 79 25 86 ab cd ef 00 00 00 00 00 00 00 00 00 00 00 00 00 00 00 00 00 00 00 00 00 6c 94
6:
O: ff 00 00 00 00 00 00 00 00 00 00 00 00 00 00 00 00 00 00 00 00 00 00 00 00 00 00 00 00 00 00 00
I: d4 d1 db 79 25 86 ab cd ef 00 00 00 00 00 00 00 00 00 00 00 00 00 00 00 00 00 00 00 00 00 6c 94
7:
O: ff 00 00 00 00 00 00 00 00 00 00 00 00 00 00 00 00 00 00 00 00 00 00 00 00 00 00 00 00 00 00 00
I: d3 d1 dc 79 24 86 ab cd ef 00 00 00 00 00 00 00 00 00 00 00 00 00 00 00 00 00 00 00 00 00 70 90
8:
O: ff 00 00 00 00 00 00 00 00 00 00 00 00 00 00 00 00 00 00 00 00 00 00 00 00 00 00 00 00 00 00 00
I: d3 d1 dc 79 24 86 ab cd ef 00 00 00 00 00 00 00 00 00 00 00 00 00 00 00 00 00 00 00 00 00 70 90
9:
O: ff 00 00 00 00 00 00 00 00 00 00 00 00 00 00 00 00 00 00 00 00 00 00 00 00 00 00 00 00 00 00 00
I: d3 d1 dc 79 24 86 ab cd ef 00 00 00 00 00 00 00 00 00 00 00 00 00 00 00 00 00 00 00 00 00 70 90
10:
O: ff 00 00 00 00 00 00 00 00 00 00 00 00 00 00 00 00 00 00 00 00 00 00 00 00 00 00 00 00 00 00 00
I: d3 d2 dc 79 24 86 ab cd ef 00 00 00 00 00 00 00 00 00 00 00 00 00 00 00 00 00 00 00 00 00 70 90

Four bar mechanism made of paper

Today I am introducing “Four bar mechanism made of paper”

The four-bar mechanism is very useful in the design of mechanical components. The best way to understand four-bar mechanisms is to build it by yourself.  Here, I am introducing how to make a four-bar mechanism with only a paper, screws and nuts. It is very easy to follow.

If you want to know the theories of four-bar mechanisms, see the wiki. Here

1. What you need to prepare

One sheet of paper, four screws and nuts, and a nail (or any sharp one)

2. Procedure

  1.   Prepare a sheet of paperSlide2
  2.  Tear the paper like thisSlide3
  3.   Fold two timesSlide4
  4.  Write numbers like the pictureSlide5
  5.  Make holesSlide6
  6.  Now you should have four bars with eight holesSlide7
  7.  Connect bars. Here the sequence is very important. If you do not follow this sequence the linkage will not rotate because interference with other linkages.Slide8
  8.  Connect allSlide9
  9.  Hold (4) and rotate (1)

This is the result.

This is a Grashof mechanism.

So far, I have introduced how to build a four-bar mechanism made of paper. I hope that this post helps your projects. If you have any question, please leave a reply.

chomod, permission change in linux

This is from “http://www.computerhope.com/unix/uchmod.htm

chmod [OPTION]… MODE[,MODE]… FILE…
chmod [OPTION]… OCTAL-MODE FILE…
chmod [OPTION]… –reference=RFILE FILE…

-c, –changes like verbose but report only when a change is made
–no-preserve-root do not treat `/’ specially (the default)
–preserve-root fail to operate recursively on `/’
-f, –silent, –quiet suppress most error messages
-v, verbose output a diagnostic for every file processed
–reference=RFILE use RFILE’s mode instead of MODE values
-R, –recursive change files and directories recursively
–help display this help and exit
–version output version information and exit

Permissions
u – User who owns the file.
g – Group that owns the file.
o – Other.
a – All.
r – Read the file.
w – Write or edit the file.
x – Execute or run the file as a program.

Numeric Permissions:
CHMOD can also to attributed by using Numeric Permissions:

400 read by owner
040 read by group
004 read by anybody (other)
200 write by owner
020 write by group
002 write by anybody
100 execute by owner
010 execute by group
001 execute by anybody

Examples

The above numeric permissions can be added to set a certain permission, for example, a common HTML file on a Unix or Linux server accessible over the Internet would be given the below permissions.

chmod 644 file.htm

This gives the file read/write by the owner and only read by everyone else (-rw-r–r–).

Files such as scripts that need to be executed need more permissions. Below is another example of a common permission given to scripts.

chmod 755 file.cgi

This would be the following 400+040+004+200+100+010+001 = 755 where you are giving all the rights except the capability for anyone to write to the file.cgi file(-rwxr-xr-x).

chmod 666 file.txt

Finally, another common CHMOD permission is 666, as shown below, which is read and write by everyone.

Tip: The above commands are all done through the command line. However, if you upload a file using FTP these permissions can also be adjusted through many FTP clients by right-clicking the file and choosing permissions.

Additional information

Below is an example of how a file may be listed when typing ( ls -l ) at the prompt as well as information on how to interpret it.

-rw-rw-r– 1   hope 123   Feb 03 15:36   file.txt

rw rw- r– 1 hope 123 Feb 03 15:36 file.txt
File owner group everyone else links owner size mod date file name